Viktor Drakenberg
Stockholm-based Technical Game Designer & Generalist with a passion for developing mechanically driven game systems and mechanics.
My Proudest Work:

Miced Out
Solo Developer (Design, Code, Art)
A retro-styled 3D platformer inspired by Mario 64 and Banjo-Kazooie.

Neila
Tech / System Design, Team Lead, Sound
Wake up in an alien research facility with newfound telekinetic powers. Escape.

Ball Bash
Game Design, UI
A lightning-paced multiplayer racing game where the last ball rolling wins!
(Click the images to read more!)
About Me:
Hello!
My name is Viktor, I'm 23 years old and live in Stockholm. I'm a fast learner and team player with a broad skillset, and have been making games for 5 years.
I've been studying Game Design as well as making games in my free time for a while now, and while it's been great fun and I've met plenty of amazing people, I feel my whole heart and soul yearning to get into the industry and join a team of creative individuals that resonate as deeply with game development as I do. If that sounds like your team, I would really love to talk! I'm currently looking for internship opportunities and junior positions!I am fluent in English and Swedish :)

My Skills:

5 years experience making games both solo and in teams of up to 20 people. Proficient at C# and using the Unity Editor.

Have created 4 complete games and 10+ prototypes using Blueprint Visual Scripting.

Solid knowledge of version control software such as Perforce, Git, Plastic.

I'm proficient in many diverse creative softwares, which I use frequently in my game projects. I'm always trying to learn something new!
Miced Out

Game Engine:

My Main Responsibilities:
Programming, Game Design, Tech Art, Level Art
Tools Used:
Unity, Rider (C#), Blender, Probuilder, Shader Graph, Photoshop
Team Size & Timeline:
Solo Project, 2 Months (Oct - Nov 2025)
(Mouse model & animations by a friend)
Code-Driven Squash & Stretch
I'm big into good game feel and polish. So with my limited animation skills, I had to come up with a creative solution to make the character feel smooth and fluid.
Therefore, I wrote a VectorSpring class with math based on Hooke's Law of Elasticity to easily add bouncy animation to the character through code. Essentially, each Spring component keeps track of a value (in this case, a 3D vector) and a target value, and continuously updates the current value through simulated spring-like forces based on the difference between the current value and the target value.A spring's stiffness and damping can be easily configured to achieve the right feel.
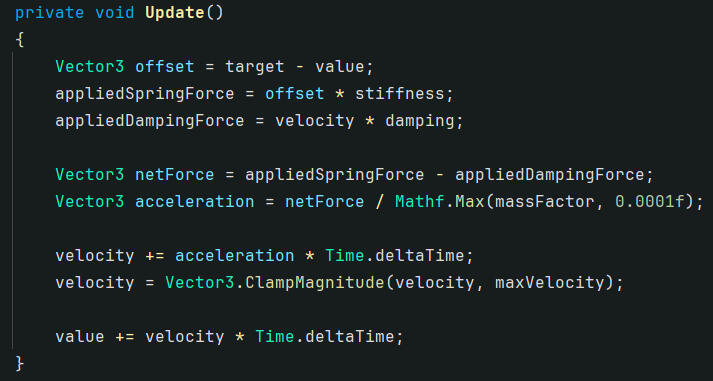
A SquashAndStretch class then tracks the value of the VectorSpring, and applies it to the scale of the character mesh transform.
With this system in place, the game felt 10 times nicer to play, as it was now extremely easy to add satisfying feedback in response to events such as jumping and landing:

By simply setting the spring's value to a vertically stretched vector when the player jumps, the spring will automatically start trying to reach its target value (1, 1, 1 in this case), creating a satisfying "bouncy" response, eventually returning the player to their standard scale.
Left: With Squash & Stretch, Right: Without
(Underlying animations are the same)
Character Controller
State Machine
Being a platformer, the core of the game's identity is the character controller. It should feel good to move around!
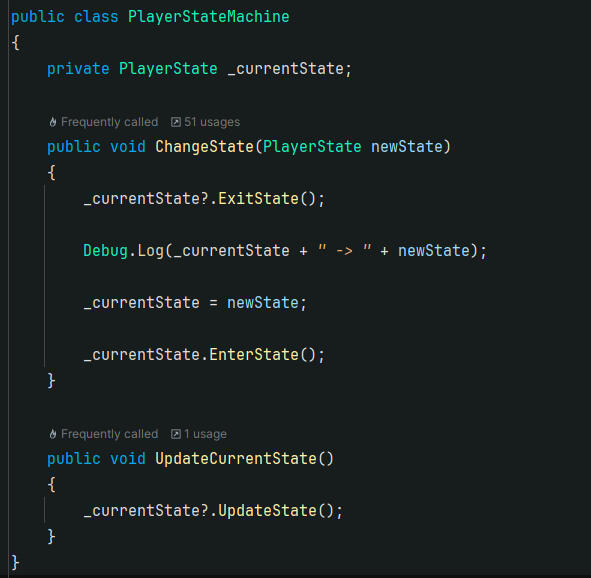
In past projects, I have usually kept all player movement logic in a single Monobehaviour class (a Unity component) attached to the player character, but this was very difficult to maintain, and always made it annoying to add new movement features. So for this project, I used a State Machine which allowed me to keep movement code in separate classes (WalkingState, JumpingState, etc) which made it way easier to add new movement techniques without breaking existing logic!
The State Machine keeps track of which PlayerState is the current state, and continually calls that state's unique tick logic, as well as any special code that should execute when a state is entered or exited. It also provides the current state with input events whenever the player presses a button, letting the current state react to the input accordingly.
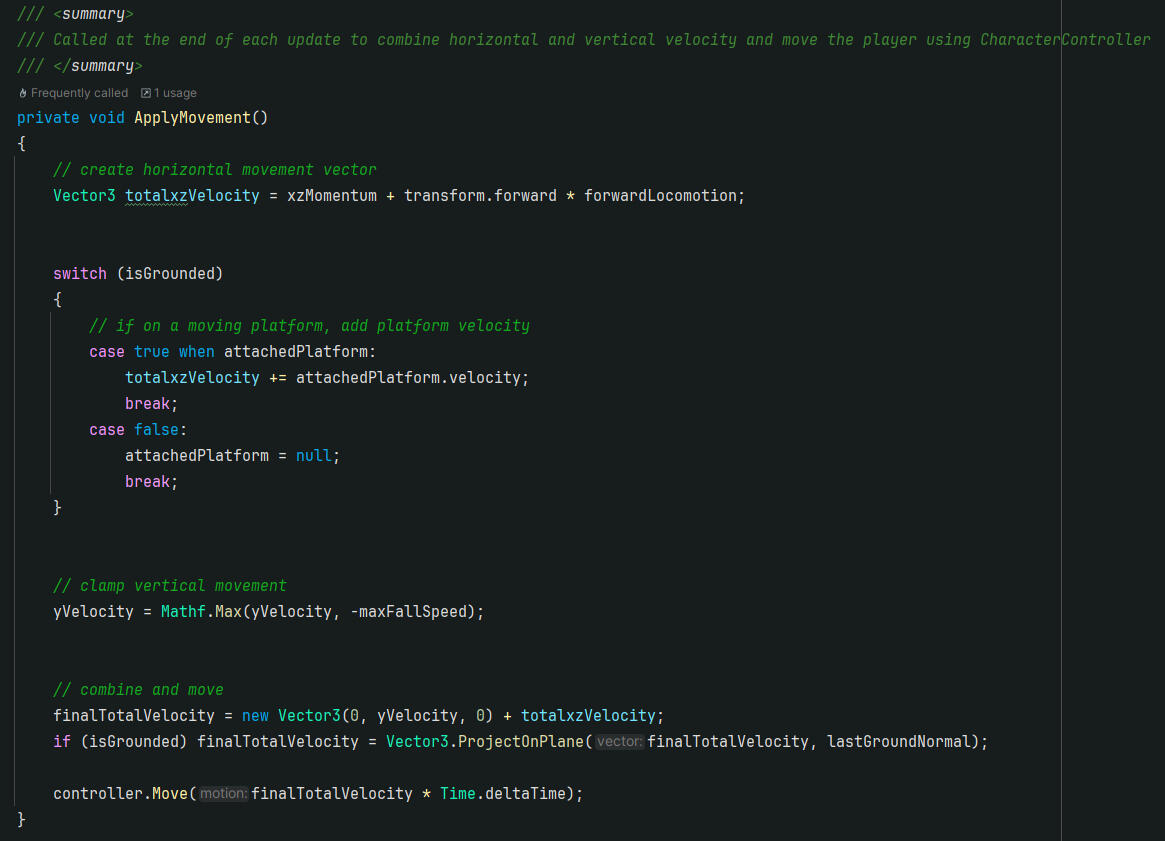
The Player Controller has properties for its current horizontal (xz) and vertical (y) velocity, which can be directly set from within states. As an example: the JumpingState immediately sets the player's vertical velocity to a high value when entered, and the WalkingState continuously adds horizontal velocity in the player's input direction.To summarize, Velocity is set in the current state, then applied to the player's position in PlayerMovement, with extra consideration for slanted surfaces and moving platforms.
An example of the player using various movement techniques, showing which state is currently active.
Walking State (In-Depth)
I really like how walking around feels in Super Mario 64, compared to most modern platformers where the player character can turn on a dime with zero resistance. I wanted the act of turning to feel relevant in this game, to slow down the pace of exploration.
To accomplish this, I analyzed how character locomotion worked in other games, and came to a simple realization. Instead of thinking of the player's walking speed as a vector pointing towards the input direction and just adding a force in that direction, it makes more sense to separate the logic into two components; forward speed and rotation speed.
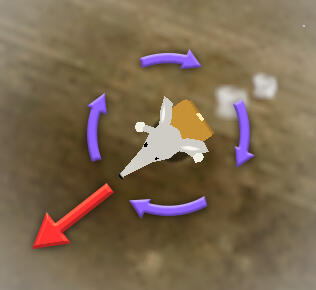
Top-down visualization of the "forces" being applied to the player character in the Walking StateForward Locomotion:
walkSpeed (float) multiplied by control stick input magnitudeRotation:
currentAngle (float) moving towards input angle with a max delta per tick of turnSpeed (float)
This way, it is easy to separate the controlling parameters for speed and turning. I'm really glad with how it turned out.

The character turns smoothly to face the input direction over time.
Orange line = Desired direction (controller input)
Blue line = Current facing direction(If the dot product between the input direction and current direction is less than a certain threshold, the player "halts" to a stop with a special animation)
With this approach, turning speed can be tweaked independently of move speed to achieve a different feel.
Non-Gameplay Systems
Save System
I developed my own save system to read and record game progress across sessions. It was my first time creating a save system like this, and it taught me a lot about the concept of Serialization in C#.
A SaveManager class keeps a reference to the currently loaded SaveData, and provides methods for saving/loading game progress from the disk at any time. The saved data is stored in a JSON-file on the user's computer.
It was especially difficult to save mission progress, as the game has multiple levels, each with several missions within, and I would only be adding more and more as development continues.
I ended up creating a "Level & Mission Database" (in the form of a Unity Scriptable Object), along with structs for representing individual Levels and Missions. This database stores all the levels and their respective missions in the whole game, with methods for setting the completion status of specific missions, and returning which ones have been completed.
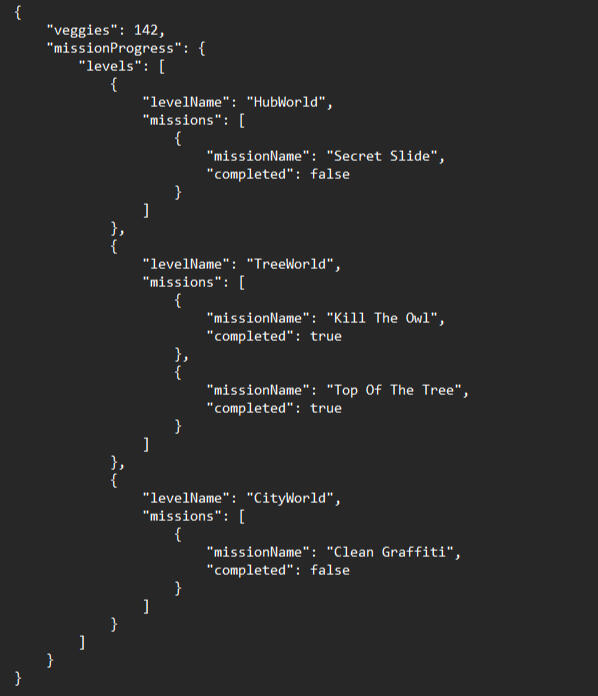
"savefile.json" tracks the number of veggies collected, and completion progress of every mission in the game.
Graphics
Rendering
To achieve a "retro" low-resolution artstyle while still allowing the game window to be resized, I had to handle the game's render resolution myself to not have it tied to window size.
To do this, I created a Render Texture with a fixed resolution of 320x240, and set it as the render target of the main Camera. This forces the game to be rendered at the desired resolution, but doesn't actually output anything to the user's display.
To display the Render Texture correctly, I made a Screenspace Canvas to place it on, and then a "UI Camera" which is set to only render the Canvas and nothing else. This way, the fixed-resolution game view gets correctly displayed to the player, and remains consistent regardless of window size.
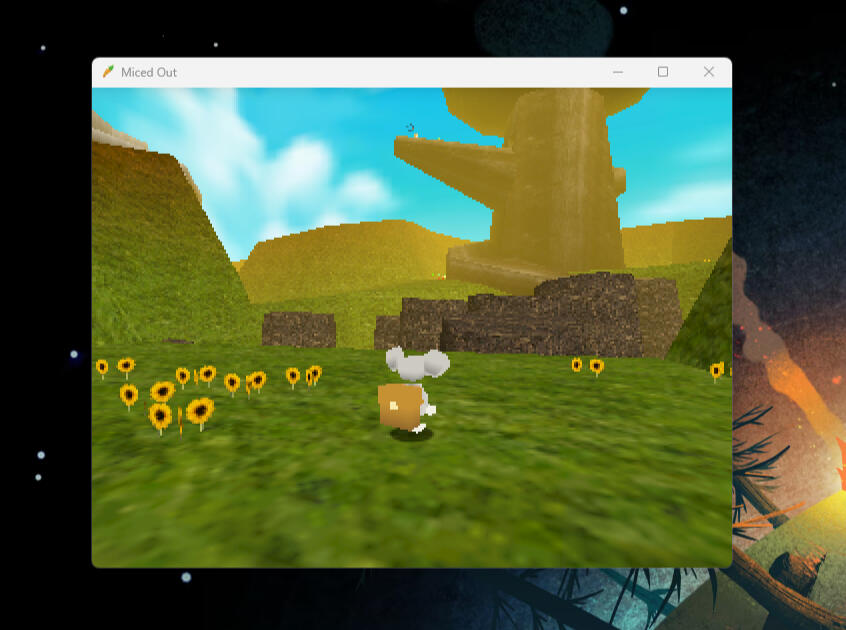
Just the right amount of pixelation!
Ball Bash

Game Engine:

My Main Responsibilities:
Game Designer, UI, Level Design
Tools Used:
Jira, Plastic SCM, Google Docs, Figma, Photoshop
Team Size & Timeline:
6 people, ~1.5 years (2022-2024)

Core Game Design
Introduction / Design Goals
The first thing I did for the project was to try and establish some concrete design goals together with the project lead, to get a solid idea for the kind of game we wanted to make. We decided that we wanted to create a social racing game that rewards mechanical skill and quick strategic thinking.
Based on this, I put together a pitch of sorts for an infinitely generated race track consisting of three lanes, where you get eliminated by falling too far behind. We then put together a team of fellow students to create a multiplayer game around this concept.
Original Prototype (Fall 2022)

Final Game (Late 2023)
Endless Level Generation
I designed a system for procedurally generating an endless racetrack, meaning every race takes place on a never-before-seen track.
I wanted to balance creative control of the level design with random variance, so I designed the system to dynamically create the level using smaller, handmade "segments", which are seamlessly combined to create the track. Every segment contains data which determines which segments it can be connected to, as well as configurable parameters for how commonly it should appear.
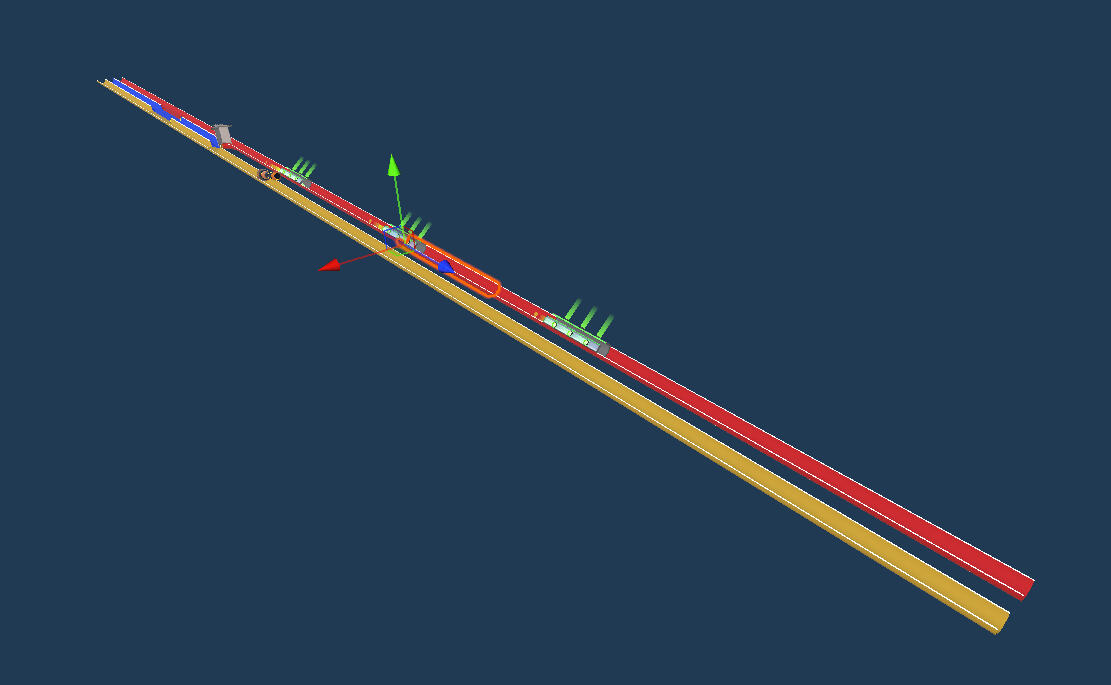
A singular "segment" which may be randomly placed in the level while playing.
Neila

Game Engine:

My Main Responsibilities:
Technical/Systems Designer, Team Lead, Sound, VFX
Tools Used:
Perforce, Jira, Blueprints, Niagara, Reaper (Sound)
Team Size & Timeline:
13 people, 7 weeks (2025)

The Glue Mechanic
Problems with the first iteration
Our first draft of the glue mechanic was letting the player shoot "glue balls", which would attach to any objects it touched. The idea was that you could first shoot a glob of glue at an object, wall, or anything, and then throw another object at the glue to attach them. However, after implementing the mechanic and trying it out, we noticed several issues.
The first version of the glue was:
• Unintuitive, playtesters did not know how to use it• Inconsistent and difficult to make use of• Slow and clunky to use, not fun
After playtesting this mechanic, it was clear that this design was fundamentally flawed. Fixing it would take too long, and even then, it wouldn't be as fun as we wanted.
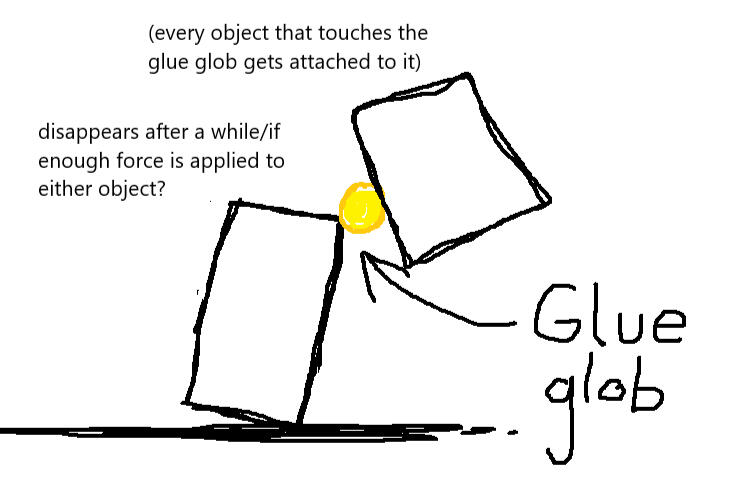
My original sketch for the glue mechanic

Trying my best to attach objects using the original glue implementation
My Prototype
To address these fundamental issues, I decided to try and rethink the glue mechanic from scratch. I wanted to make the act of connecting two objects as simple as possible.
I created another MS Paint sketch, quickly ran it by my fellow designers, then immediately got to work on creating a prototype using Blueprints. After a couple of hours, I had what can be seen in the GIF.
How it works:
Instead of firing balls of glue, this implementation performs raycasts from the camera whenever the player clicks or releases right-click, and remembers which actors were hit during both the click and release of the button, as well as the precise position where they were clicked, in local space.
Then, if at least one of the two actors is a physics-object, a continuous attraction force will be applied, bringing the two objects together and effectively attaching them.
Results:
After making the prototype I did some internal playtesting with my teammates, and the results were clear; this implementation was way more fun, and much easier to use! It was still a bit inconsistent sometimes, and obviously unpolished. Without proper feedback, it could feel confusing and hard to know which objects you were connecting.

Gluing two cubes together, and then attaching them to the ceiling, with my "Glue V2" prototype.
Final Glue Mechanic
Transition to C++
To create the final version of the Glue Mechanic, I worked together with a programmer to recreate the feature in C++ instead of Blueprints. We worked together closely for several days to get the feature working consistently.
Adding Feedback / Polish
While rewriting the feature in C++, we made sure to integrate several callbacks to Blueprint functions that we could use to add feedback responses (Sound, VFX) to improve the responsiveness and usability of the mechanic.We added a stretched out green "goop" mesh which appears whenever the player begins gluing, clearly previewing the connection before the button is released. I then also created sound effects and Niagara particles for whenever the player initiates and finishes a glue connection, as well as an extra sound when/if the two objects successfully attach.
Playtest Iteration
We noticed during playtests that a lot of players instinctually wanted to use the glue while holding an object with telekinesis, which wasn't possible at the time. To solve this, we made it so that if the player tries to activate glue while holding an object, it will directly glue the held object to the surface they are looking at.

The final version of the glue mechanic, complete with visual and auditory feedback.
Other Stuff
Dynamic Music
Halfway through the project's development, we got in contact with a composer who offered to make some music for the game! They provided us with a long, looping atmospheric track, with a separate percussion layer intended to be overlayed during combat.
I implemented a dynamic music system that would automatically play both tracks simultaneously and handle fading between the layers according to configurable parameters. I connected the system to fade in the intense layer when enemies were near the player, and then fade out after they were defeated.
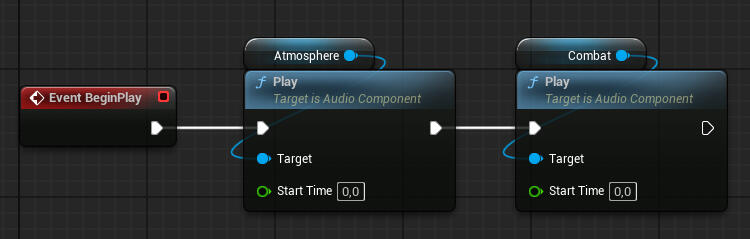
The two layers are played simultaneously on separate audio sources, meaning their volumes can be changed independently.
SFX / VFX
I created all of the game's sound effects by mixing together and editing various free-to-use sound clips from freesound.org, using the audio editing software Reaper. My priority was to create sounds that made the game feel more responsive and fun to play. I'm especially fond of the glue sounds...
And since the game is all about using your telekinetic powers, I really wanted them to feel satisfying to use. I used Unreal's Niagara Particle System to create an impact vfx, and also created a Camera Shake system to make heavy hits feel even more impactful.

(Enable sound when viewing!)
Four Flipper Forest


Game Engine:

My Main Responsibilities:
Technical/Systems Designer, Team Lead, Sound, VFX
Tools Used:
Perforce, Jira, Blueprints, Niagara, Reaper (Sound)
Team Size & Timeline:
13 people, 7 weeks (2025)
Four Flipper Forest

Game Engine:


My Main Responsibilities:
Technical/Systems Designer, Team Lead, Sound, VFX
Tools Used:
Perforce, Jira, Blueprints, Niagara, Reaper (Sound)
Team Size & Timeline:
13 people, 7 weeks (2025)
